
You don’t need a big backyard or expensive pots to grow your own peppers. With just a few recycled plastic bottles, some quality soil, and a sunny spot, you can start a thriving pepper garden right at home. Whether you prefer sweet bell peppers or spicy chili varieties, this low-cost and eco-friendly gardening method is perfect for urban gardeners, small-space dwellers, or anyone looking to grow fresh produce sustainably.
Why Grow Peppers in Bottles?
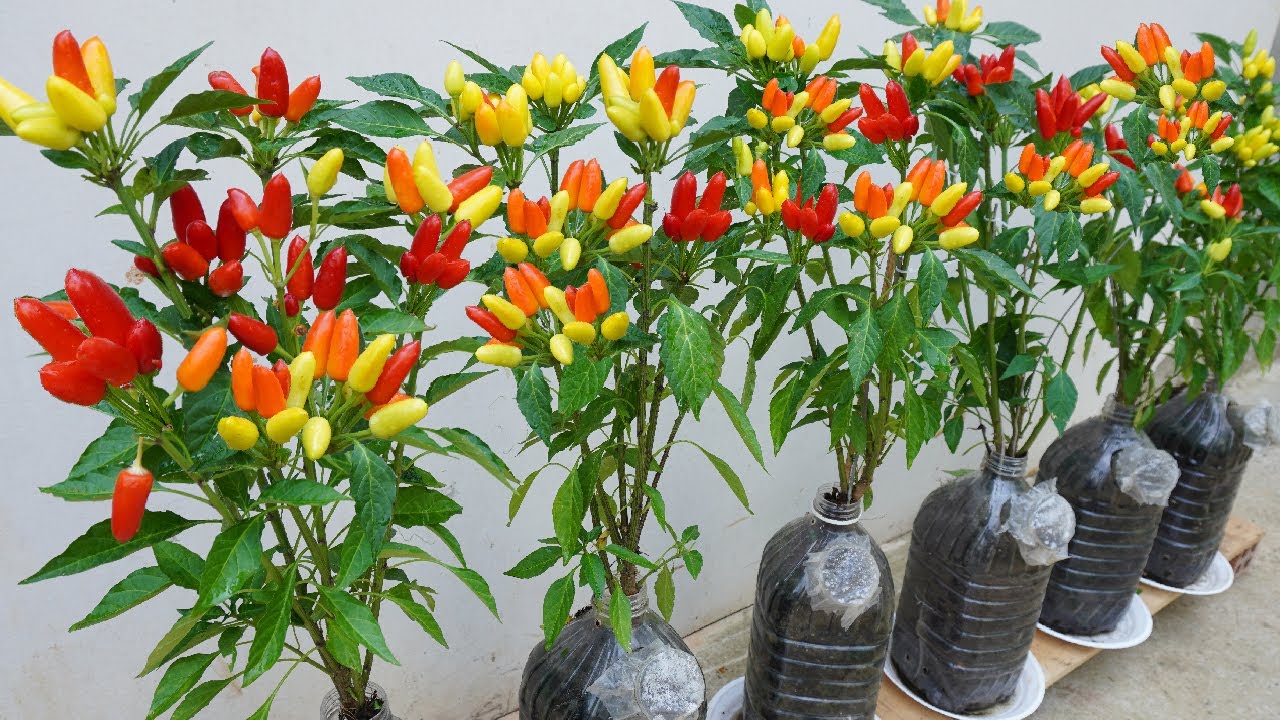
Peppers are compact plants that grow well in containers, making them ideal candidates for recycled bottle gardening. Plastic bottles not only help reduce waste but also provide a functional container that’s easy to move, manage, and monitor. When planted in the right size bottle with good drainage and sunlight, peppers can flourish just as well as in traditional garden beds.
This method is perfect for balconies, patios, window ledges, or even indoor spots that receive enough sunlight. It’s also a great project for beginners and a creative way to reuse plastic that would otherwise end up in landfills.
Materials Needed
Here’s what you’ll need to get started:
-
1.5 to 2-liter plastic bottles (clear soda bottles are ideal)
-
Scissors or a sharp utility knife
-
Potting mix (well-draining and rich in organic matter)
-
Pepper seedlings or seeds (any variety you like)
-
A small tray or shallow container to catch excess water
-
Water
-
Optional: compost or liquid fertilizer
Preparing the Bottles
-
Clean the Bottles: Wash the bottles thoroughly to remove any residue or labels. Allow them to dry completely.
-
Cut for Planting: Using a sharp knife or scissors, cut the bottle horizontally—either halfway or two-thirds from the bottom, depending on how deep your container needs to be. Remove the top portion and keep the bottom as your planting pot.
-
Add Drainage Holes: Use a heated nail or tip of a knife to poke several small holes in the base of the bottle. This is crucial to allow excess water to drain and avoid root rot.
-
Set Up the Base: Place the bottle on a tray or plate to catch draining water and make the setup more portable.
Choosing and Planting the Peppers
You can either start from seeds or use young pepper seedlings from a nursery. Starting from seedlings will give you a head start, especially if you’re planting late in the season.
-
Fill with Soil: Add potting mix to your bottle container, leaving about 3–5 cm from the top. A mix of potting soil, compost, and a bit of sand or perlite works well to ensure good drainage.
-
Plant the Seedling or Seeds:
-
If planting seedlings, make a hole in the center of the soil and gently place the root ball inside. Cover and pat the soil down gently.
-
If using seeds, plant 2–3 seeds about 1 cm deep and cover lightly with soil. After germination, thin out the weaker seedlings to leave the healthiest one.
-
-
Watering: Water gently until the soil is evenly moist. Avoid overwatering—keep the soil damp, not soaked.
-
Sunlight: Place your container in a sunny spot. Peppers love warmth and light, so ensure they get at least 6–8 hours of sun daily. A sunny windowsill, balcony, or patio is ideal.
Ongoing Care and Maintenance
-
Watering: Keep the soil consistently moist, especially during hot weather. Water when the top layer feels dry. Be careful not to overwater—check that the bottle drains properly.
-
Feeding: Once the plant has established, feed it every 2–3 weeks with a diluted organic fertilizer or compost tea to encourage flowering and fruiting.
-
Support: As the pepper plant grows, it might become top-heavy. Use a stick or small stake inserted into the bottle to help support the plant.
-
Pruning: For bushier plants and more peppers, pinch off the top of the plant when it reaches 20–25 cm tall. Remove any yellowing or damaged leaves to maintain plant health.
Flowering and Pollination
Peppers produce small white flowers before fruiting. If growing indoors or in areas with little airflow, gently shake the plant or use a soft brush to help transfer pollen from one flower to another and encourage fruit development.
Harvesting Your Peppers
Depending on the variety, peppers are usually ready for harvest 60–90 days after planting. You can pick them when they’re green or wait until they change color (red, yellow, orange, etc.) for maximum flavor and sweetness. Use scissors or gently twist the fruit to avoid damaging the plant.
Replanting and Expanding
After your first harvest, continue to care for the plant—it may keep producing for several weeks or months. If the plant becomes root-bound or too large for the bottle, consider transferring it to a larger container.
You can also reuse the bottle by adding fresh soil and compost and planting new seeds or seedlings. With staggered planting every few weeks, you’ll enjoy a steady supply of peppers throughout the growing season.
Benefits of Bottle-Grown Peppers
-
Space-saving: Ideal for small spaces and vertical gardening.
-
Eco-friendly: Recycles plastic waste into useful containers.
-
Low cost: Requires minimal tools and materials.
-
Fresh and flavorful: Homegrown peppers taste better and are pesticide-free.
-
Beginner-friendly: Simple to start and maintain.
Creating a pepper garden using recycled bottles is a smart, sustainable, and satisfying way to grow your own food. With a bit of care and creativity, you can turn everyday waste into a productive and colorful addition to your home gardening journey.

: 15 Benefits and Natural Homemade Uses You Should Know")
