
This is for informational purposes only. For medical advice or diagnosis, consult a professional.
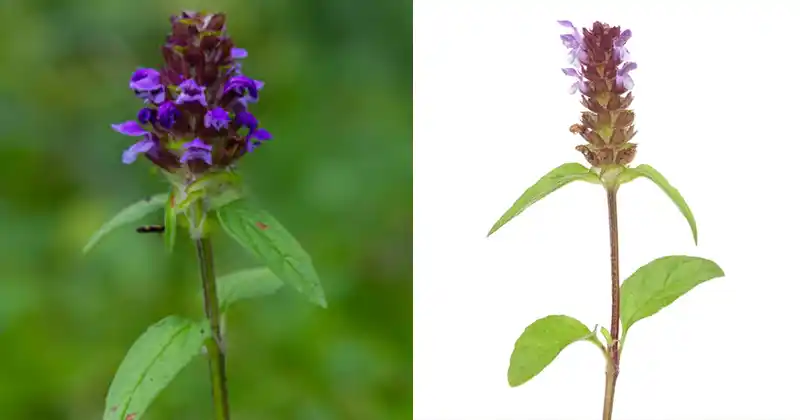
If you’ve ever looked at a patch of un-mowed lawn and noticed tiny, vibrant purple flowers hugging the ground, you’ve likely already met Common Selfheal (Prunella vulgaris).
For a newbie forager, stepping into the world of wild plants can feel overwhelming. It’s completely normal to feel a mix of excitement and hesitation—after all, you want to make sure you are picking the right plant and actually using it effectively! Selfheal is the perfect beginner’s plant. It is abundant, safe, incredibly forgiving to identify, and lives up to its historical nickname: “Heal-All.”
Here is your grounded, no-nonsense guide to understanding the power of Selfheal and exactly how to harness it in your own home.
What is Selfheal and How Do I Identify It?
Before you use any wild plant, you need to be 100% sure of its identity. Fortunately, Selfheal is a member of the mint family, which has some very distinct characteristics.
Look for these key identifiers:
- The Stem: Roll the stem between your fingers. It will feel distinctly square, not round.
- The Leaves: They grow opposite one another along the stem. They are oval-shaped, slightly pointed at the tip, and can have smooth or very slightly toothed edges.
- The Flowers: This is the giveaway. It features a dense, blocky, almost cone-like flower head. The tiny flowers are usually a brilliant purplish-blue (sometimes pink or white) and are shaped like little open hoods or two-lipped mouths.
- Scent: Unlike peppermint or spearmint, Selfheal lacks a strong minty aroma. It smells faintly herbaceous and earthy.
Forager’s Golden Rule: Never harvest from areas treated with pesticides, herbicides, or areas near heavy road traffic. Always forage at least 50 feet away from busy roads.
The Power of Selfheal: What Does It Actually Do?
While folklore calls it “Heal-All,” it’s important to keep expectations grounded in reality. Selfheal won’t cure a broken bone or a major illness, but it is a powerhouse of a first-aid and gentle wellness herb. Its power comes from high levels of rosmarinic acid (a potent antioxidant) and its rich, astringent tannins.
Here is what it excels at:
- Wound Healing: It is a gentle “vulnerary” (wound-healing) and hemostatic (blood-stopping) herb. It helps draw tissues together, making it fantastic for minor cuts, scrapes, and bug bites.+1
- Soothing Inflammation: Taken internally or applied externally, it reduces heat and swelling.
- Mouth and Throat Health: Its astringent properties make it an excellent gargle for sore throats, bleeding gums, or mouth ulcers.
- Immune Support: Traditionally, it is used to support the body’s natural defenses, particularly during changing seasons.
How to Use Selfheal at Home
You don’t need a fancy laboratory to extract the benefits of this plant. Here are three incredibly simple, effective ways to use it at home.
1. The Field Poultice (For Instant Relief)
This is the most primal and immediate way to use Selfheal. If you are out hiking or gardening and get a mosquito bite, bee sting, or a minor scratch, look down.
- How to do it: Pluck a few fresh, clean Selfheal leaves and flowers. You can either crush them thoroughly between your fingers until they release their dark green juices, or pop them in your mouth and chew them for a few seconds (the “spit poultice” method).
- Application: Press the mashed plant material directly onto the bite or scrape. It will cool the area, relieve the itch, and help stop minor bleeding instantly.
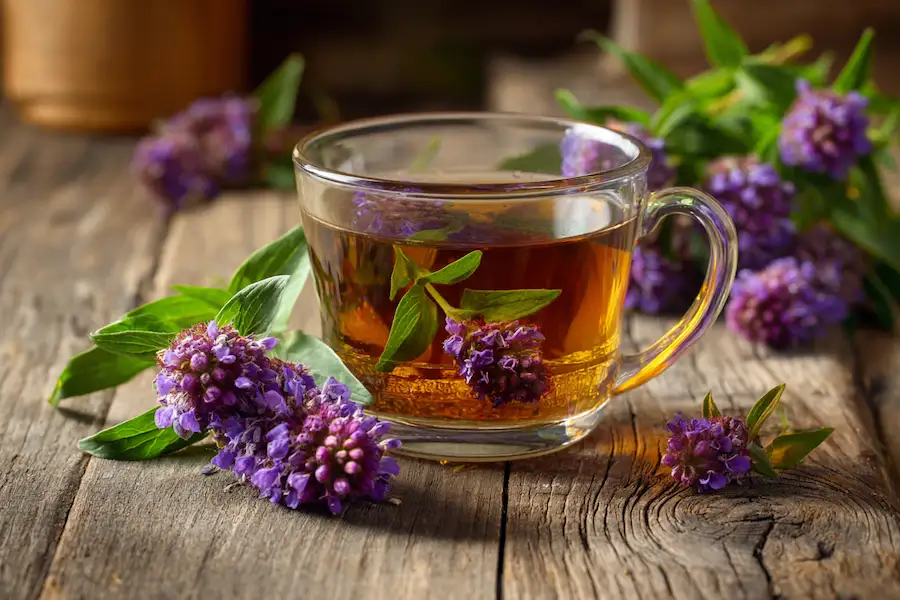
2. The Soothing Selfheal Infusion (Tea)
This is perfect for soothing a scratchy throat, easing an upset stomach, or just enjoying a mild, earthy cup of wild goodness.
- Harvesting: Snip the top few inches of the plant (leaves and flower heads). You can use them fresh or dry them on a screen out of direct sunlight for later use.
- The Recipe: 1. Place 1 tablespoon of dried Selfheal (or a small handful of fresh plant matter) into a mug. 2. Pour boiling water over the herb. 3. Cover the mug with a plate or lid to keep the volatile oils from escaping. 4. Steep for 10 to 15 minutes. 5. Strain and drink.
- Tip: If you have a sore throat, let the tea cool slightly, add a spoonful of honey, and gargle it before swallowing.
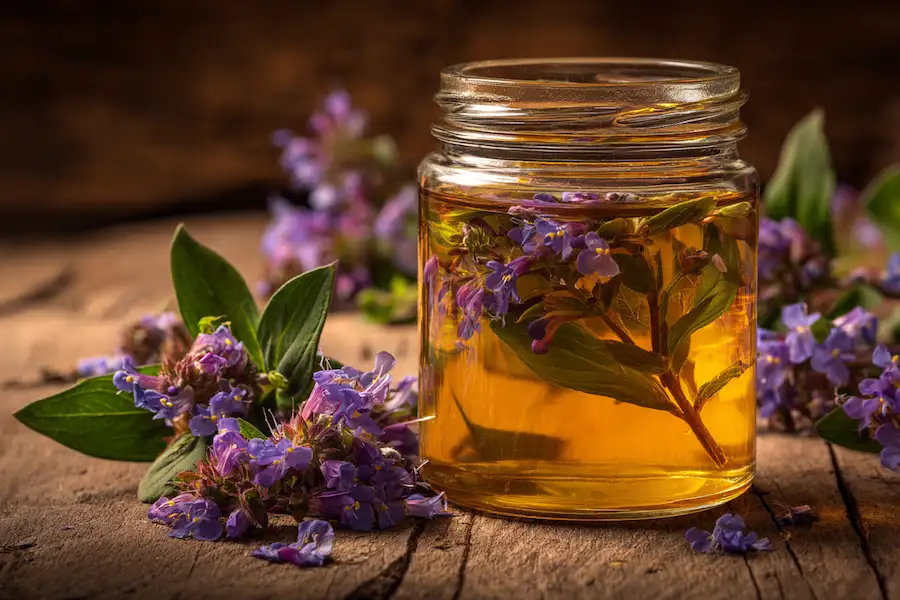
3. Homemade First-Aid Oil
If you want to preserve the healing power of Selfheal for the winter months, an infused oil is the way to go. You can use this oil directly on dry skin, mild rashes, or minor scrapes.
- The Process:
- Harvest fresh Selfheal leaves and flowers. Crucial step: Let them wilt on a towel for 12 to 24 hours to allow excess water to evaporate (water in your oil will cause it to go rancid or moldy).
- Chop the wilted plant material loosely and place it in a clean, dry glass jar.
- Cover the plant material completely with a “carrier oil”—olive oil, sweet almond oil, or jojoba oil work beautifully. Make sure the oil sits about an inch above the herbs.
- Cap the jar and place it in a sunny windowsill for 4 to 6 weeks, shaking it gently every few days.
- Strain the oil through cheesecloth into a clean bottle, squeezing out as much liquid as possible. Compost the spent herbs.
A Gentle Reminder for the Newbie Forager
Foraging is a wonderful way to connect with the earth, but it requires respect. Always leave more than you take. Selfheal is a vital late-season nectar source for bees and butterflies. Snip only what you need, leave the roots intact so the plant can regrow, and enjoy the quiet satisfaction of making your own remedies from the ground beneath your feet.

: 15 Benefits and Natural Homemade Uses You Should Know")
